
The fastest safe path is this: open Settings > System > About for CPU, RAM, Windows version and system type, then open Task Manager > Performance > GPU if the question involves games, graphics drivers, external monitors or video work. Use Settings > System > Storage for free space, and System Information (msinfo32) when you need the exact PC model, BIOS Mode, Secure Boot State or TPM context.
If you are about to ask someone for help, copy only the useful parts: CPU, RAM, GPU, storage free space, Windows version, exact system model and one sentence about the problem. That gives a support helper enough context without exposing product IDs, device IDs or BitLocker details.
This guide starts with the built-in Windows tools that answer those questions without changing BIOS, TPM, Secure Boot or driver settings just to look. Near the end, it also covers a few free third-party utilities for cases where Windows does not show enough detail.
Quick Answer
Open Settings > System > About
For most people, this is the fastest safe check. It shows the processor, installed RAM, 32-bit or 64-bit system type, Windows edition and Windows version.
msinfo32 for BIOS Mode, Secure Boot State, model and components.Do not change firmware, TPM, CSM, Legacy BIOS, boot order or Secure Boot settings just to check your specs. First read the status from Windows. If BitLocker is enabled, make sure you have the recovery key before any firmware or Secure Boot changes.
If You Need Help, Copy These Specs
If a friend, seller, game forum or support agent asks “what PC do you have?”, do not send ten random screenshots. Send the smallest set that answers the question.
For most support conversations, this is enough:
- Settings > System > About for CPU, RAM, Windows edition, version and system type.
- Task Manager > Performance > GPU if the question involves games, video, AI tools, external monitors or graphics drivers. If a laptop seems to use the wrong graphics chip, use the wrong-GPU support path after you confirm which GPUs Windows sees.
- Settings > System > Storage if the question involves installing a game/app, moving files or choosing an SSD.
- System Information (
msinfo32) > System Summary if the question involves Windows 11, Secure Boot, BIOS Mode or the exact laptop/desktop model.
For a buying or upgrade question, add one sentence of context: “I want to play CS2 at 1080p,” “I need more storage for games,” or “I want to know if this laptop can run Windows 11.” Specs without the goal often lead to bad advice.
Before sharing, crop or blur device names, product IDs, serial numbers, user names, Microsoft account email, BitLocker details and anything from the Details tab in Device Manager. The helper usually needs the model names and capacities, not your identifiers.
What Each Spec Means
Before you start clicking through Windows screens, it helps to know what you are looking for.
| Term | Plain-English meaning | Why it matters |
|---|---|---|
| CPU | The main processor that runs general instructions. | Affects app speed, multitasking, game frame rates and Windows compatibility. |
| RAM | Short-term working memory used by active apps. | Too little RAM causes slowdowns when many apps, browser tabs or games are open. |
| Storage | The SSD or hard drive where files and apps stay after shutdown. | Affects free space, loading times and upgrade planning. |
| GPU | The graphics processor, integrated into the CPU or on a dedicated graphics card. | Important for games, video editing, 3D work, AI tools and external displays. |
| VRAM | Graphics memory used by the GPU. | Games and creative apps often list VRAM requirements separately from system RAM. |
| TPM | A security processor used for keys, device security and Windows 11 requirements. | Windows 11 requires TPM 2.0, and BitLocker/device encryption can depend on it. |
| UEFI | The modern firmware mode that starts the PC before Windows loads. | Secure Boot depends on UEFI, and Windows 11 requires a Secure Boot-capable PC. |
| Secure Boot | A UEFI security feature that checks trusted boot software before Windows starts. | Useful for Windows 11 readiness, anti-cheat requirements and early-boot security. |
The most common mix-up is RAM vs storage. RAM is the workspace for programs running right now. Storage is where files live permanently. If Windows says you are low on disk space, adding RAM will not fix that. If a game says you need 16 GB of memory, it usually means system RAM, not a 16 GB SSD.
Where to Find Each Spec
Use this table when you already know what you need to find.
| Need to check | Best built-in tool | Where to look | Note |
|---|---|---|---|
| CPU model | Settings or Task Manager | Settings > System > About, or Task Manager > Performance > CPU | Task Manager also shows cores/logical processors on many PCs. |
| Installed RAM | Settings or Task Manager | Settings > System > About, or Task Manager > Performance > Memory | Task Manager may also show speed and slots used. |
| Free storage | Settings | Settings > System > Storage | Use advanced storage settings if you have more than one drive. |
| GPU model | Task Manager, dxdiag or Device Manager | Performance > GPU, dxdiag > Display, or Device Manager > Display adapters | Laptops may show both integrated and dedicated graphics. |
| VRAM | Task Manager or dxdiag | Task Manager > Performance > GPU, or dxdiag > Display | Do not confuse shared memory with dedicated VRAM. |
| Windows version | Settings | Settings > System > About > Windows specifications | Useful for support, drivers and update troubleshooting. |
| DirectX version | dxdiag | Run dxdiag, then read the System tab | Useful for games and graphics troubleshooting. |
| BIOS Mode | System Information | Run msinfo32, then read System Summary | For modern Windows 11/security checks, you usually want UEFI. |
| Secure Boot State | System Information or Windows Security | Run msinfo32, or open Windows Security > Device security | State wording can vary by device and Windows build. |
| TPM version | Windows Security or tpm.msc | Windows Security > Device security, or run tpm.msc | Windows 11 requires TPM 2.0. |
The screenshots below are real Windows screens or sanitized support-style captures. Identifying fields such as device names, product IDs, system IDs, user names, driver paths and security details are hidden or cropped where needed.
Method 1: Check Basic Specs in Settings
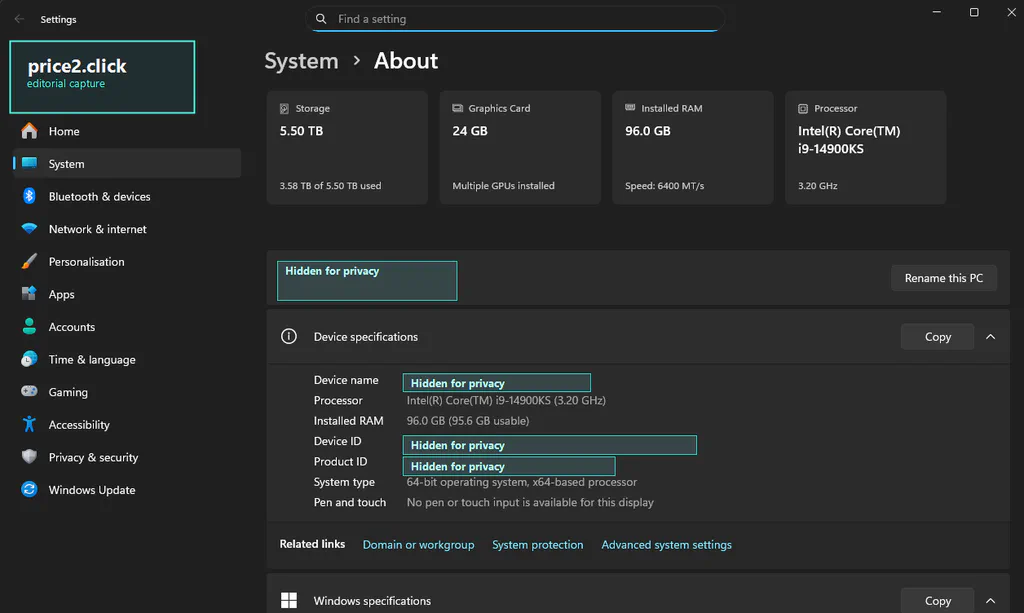
Press Windows key + I, then go to System > About.
Look for two blocks:
- Device specifications: processor, installed RAM, device name, device ID, product ID and system type.
- Windows specifications: Windows edition, version, OS build and install date.
This is the right screen when a support form asks what CPU or RAM your PC has. It is also the easiest screen to copy from, but be careful before sharing screenshots: device name, device ID and product ID can appear on the same page.
What to read from this screen:
- Processor for the CPU model.
- Installed RAM for the memory amount.
- System type for 64-bit vs 32-bit Windows.
- Edition, version and OS build when a driver, game, update or support page asks what Windows you use.
If you are asking whether the PC can run a game, this screen is only the start. You still need the GPU and sometimes VRAM from Task Manager or dxdiag.
Settings > System > About is the fastest safe starting point for CPU, RAM, system type and Windows version.
Settings is not enough when you need the graphics card, VRAM, storage model, BIOS mode or Secure Boot state. For those, use the next tools.
Method 2: Check Free Storage Space
Open Settings > System > Storage.
This shows how much space is used and free on your main drive. If your PC has more than one drive, open Advanced storage settings and look for the option that shows storage used on other drives.
Storage is the answer when Windows says you cannot install a large game, download a file or save more photos. RAM is the answer when heavy apps slow down because there is not enough working memory. They are different problems.
If the storage section shows you are almost full and the PC still uses an old hard drive, our SSD buying guide can help with model choices later. First, confirm what you have and how much space you need.
Method 3: Use Task Manager for Live CPU, RAM and GPU Details
Press Ctrl + Shift + Esc, then open the Performance tab.
Task Manager is a live dashboard. It is useful when you want to know not only what hardware is installed, but also what the PC is doing right now.
Check these panels:
- CPU: processor model, current usage, speed, cores, logical processors and virtualization status on many systems.
- Memory: installed RAM, current usage, speed, slots used and form factor where available.
- Disk: drive activity and, on newer Windows builds, more drive detail on some systems.
- GPU: graphics processor name, utilization, dedicated GPU memory, shared GPU memory and driver context.
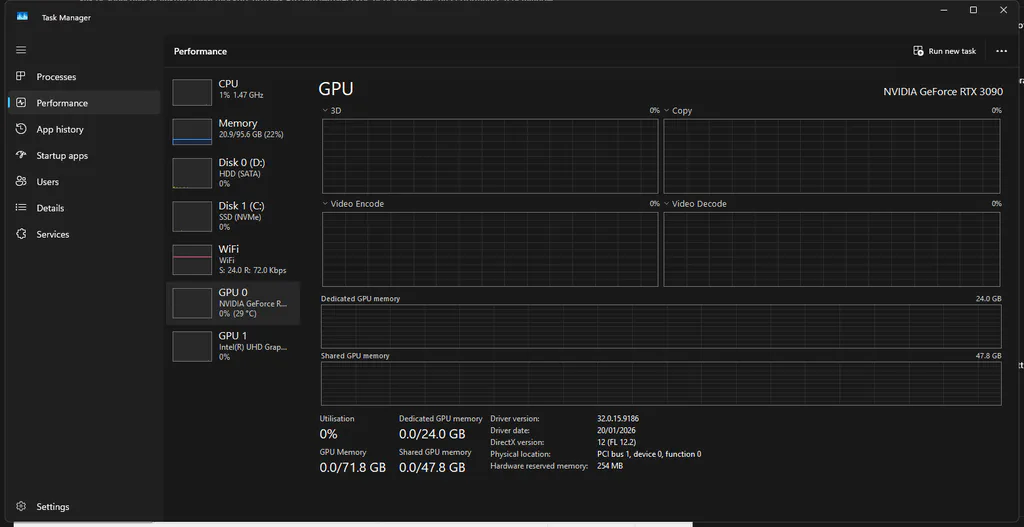
Task Manager is the best built-in live view for CPU, memory and GPU activity, including dedicated GPU memory.

Use the Performance tab for a quick read. Do not use it as a perfect hardware inventory. GPU memory values can differ between Windows views, and some counters depend on the graphics driver. If you need a cleaner GPU report, use dxdiag or System Information as well.
For gaming support, this is usually the screen to capture first: CPU, Memory and GPU panels. If a game is open, capture the GPU panel while the problem is happening. A screenshot that shows the GPU name, GPU usage and dedicated GPU memory is more useful than a sentence like “my PC is good.”
Method 4: Use System Information for a Full Built-In Report
Press Windows key + R, type msinfo32, and press Enter.
System Information is the best built-in all-in-one report. In System Summary, look for:
- OS Name and Version
- System Manufacturer and System Model
- Processor
- Installed Physical Memory
- BIOS Mode
- Secure Boot State
For graphics details, open Components > Display. For drive and storage details, explore the storage-related component sections.

System Information is the built-in screen to check BIOS Mode and Secure Boot State without changing firmware settings.
This tool is powerful, but dense. Do not expect every field to be beginner-friendly. Microsoft also notes that running System Information as administrator can improve accuracy for driver and service details. For ordinary specs, opening it normally is usually enough.
For a laptop, System Manufacturer and System Model are often the most useful lines. They tell you the exact family to search on the manufacturer’s support site. “HP laptop” or “Lenovo Ideapad” is too vague; the model line is what points to the right BIOS, drivers, RAM limits and storage layout.
Method 5: Use dxdiag for Games, GPU and DirectX
Press Windows key + R, type dxdiag, and press Enter.
The DirectX Diagnostic Tool is especially useful when a game or graphics app asks for DirectX, GPU or driver information.
Use these tabs:
- System: Windows version, processor, memory and DirectX version.
- Display: GPU name, display memory, driver model and DirectX features.
- Sound/Input: audio and input device context if you are troubleshooting game or app problems.
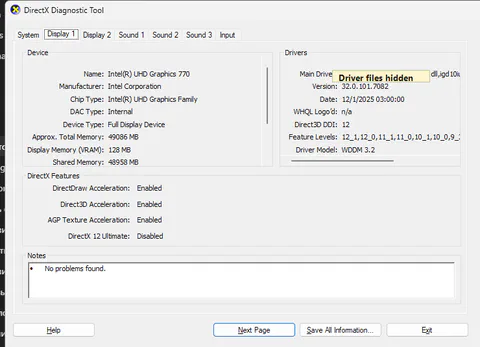
Use dxdiag when a game or graphics app asks for DirectX, GPU, driver or VRAM details.
If you use Save All Information, review the text file before sending it to someone. A dxdiag report can include computer name, driver paths and other system details that are more than a casual support forum needs.
Also be careful with the phrase “Approx. Total Memory.” It can include shared memory on some systems. If a game asks for dedicated VRAM, compare the result with Task Manager’s GPU memory view and the GPU manufacturer’s specs when possible.
Method 6: Use Device Manager for Hardware and Drivers
Right-click the Start button and open Device Manager.
Device Manager is not the cleanest way to check specs, but it is useful when you need to know what Windows recognizes.
Helpful sections include:
- Display adapters: graphics chips/cards detected by Windows.
- Processors: CPU entries reported to Windows.
- Disk drives: storage devices visible to Windows.
- Network adapters: Wi-Fi, Ethernet and Bluetooth-related adapters.
- Sound, video and game controllers: audio devices and related drivers.
You can open a device’s Properties > Driver tab to see the driver provider, version and date. Avoid clicking Disable device, Uninstall device or random driver actions unless you are deliberately troubleshooting.
If Device Manager shows Code 28 or an unknown device after reinstalling Windows, do not start with a random driver bundle. Use the official-driver support path for Code 28 after you identify the exact device or Hardware ID.
Do not publish screenshots of the Details tab unless you have reviewed them carefully. Hardware IDs, PNP Device IDs and device instance paths can reveal more than you intend.
Check TPM and Secure Boot Safely
For Windows 11 readiness and some security/anti-cheat requirements, you may need TPM and Secure Boot status.
Start with read-only checks.
Open Windows Security > Device security and read the Security processor and Secure Boot sections if they are available.
Press Windows key + R, type tpm.msc, and check whether TPM is ready and whether the Specification Version is 2.0.
If TPM or Secure Boot is off, do not immediately change BIOS/UEFI settings. First back up BitLocker recovery keys and check your PC maker's instructions.
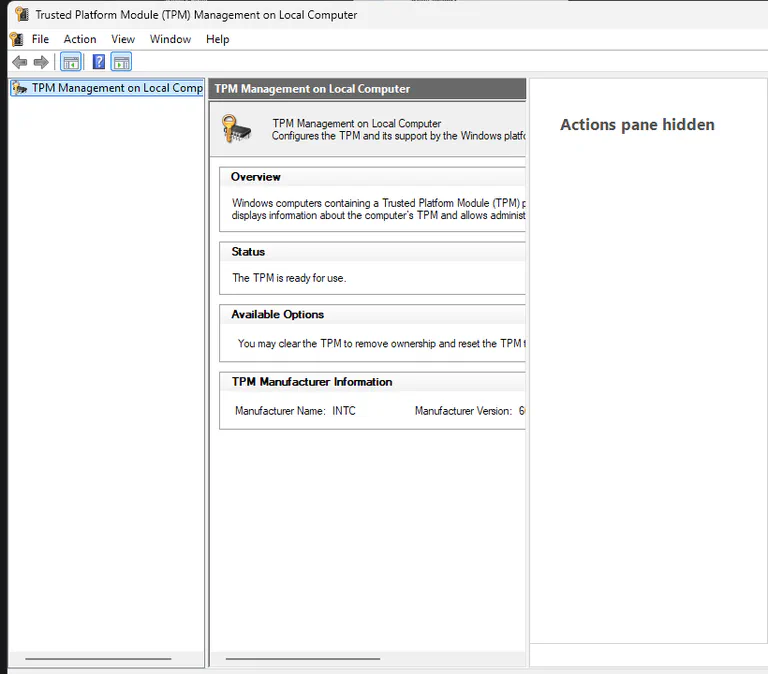
Check TPM and Secure Boot status from Windows first. Firmware changes come only after recovery keys and device-specific instructions are ready.
In msinfo32, check:
| Field | Useful result | What it means |
|---|---|---|
| BIOS Mode | UEFI | The PC is using modern firmware mode. Secure Boot depends on UEFI. |
| Secure Boot State | On, where supported | Secure Boot is currently enabled. Wording may vary if unsupported or unavailable. |
| TPM status | TPM 2.0 in Windows Security or tpm.msc | Windows 11 requires TPM 2.0. If not visible, TPM may be disabled in firmware. |
Important nuance: Windows 11 requirements use Secure Boot capability language. Do not read that as permission to blindly flip firmware settings. A PC can be UEFI-capable, Secure Boot-capable, Secure Boot off, or misconfigured in ways that require model-specific steps. BitLocker recovery can also be triggered by firmware and boot-setting changes.
If this check already turned into a real troubleshooting problem, use the matching support case before changing more settings: TPM disappeared after a BIOS update, BitLocker asks for a recovery key after a BIOS or Secure Boot change, or Secure Boot looks enabled in firmware but Windows says off.
For the related 2026 Secure Boot certificate transition, see our Windows Secure Boot certificate guide.
Optional Free Utilities for Deeper Specs
Most people should start with Windows Settings, Task Manager, System Information and dxdiag. They are already installed, they are safer for beginners, and they are enough for sharing basic specs with a friend, seller or support forum.
Third-party tools become useful when you need details Windows hides or spreads across too many screens: exact RAM module data, motherboard model, BIOS version, SSD health clues, GPU memory details, sensor readings or a compact report.
| Free tool | Best use | Editorial notes |
|---|---|---|
| Speccy | Simple one-page PC summary for CPU, RAM, motherboard, graphics, storage and temperatures. | Good beginner choice from the CCleaner/Gen Digital family. The official page currently lists Windows 10 and older in system requirements, so use Windows tools or HWiNFO if a Windows 11 machine looks misdetected. |
| HWiNFO | Deep hardware inventory, sensor readings, exact motherboard/BIOS/RAM/storage details. | Best power-user option. Free for non-commercial use, with installer and portable downloads from HWiNFO's official site. |
| CPU-Z | CPU model, motherboard/chipset, RAM type, timings and SPD module details. | Useful when choosing RAM or checking a processor. Download only from CPUID's official page and be cautious: CPUID's download chain was briefly abused in April 2026 before being fixed. |
| GPU-Z | GPU name, VRAM size, memory bus, driver details and graphics-card identifiers. | Good when a game, repair shop or buyer needs exact graphics-card details. Use TechPowerUp's official GPU-Z page. |
Use the official project page, avoid search-ad download buttons, skip mirrors unless the developer explicitly lists them, and stop if the file name, language or installer branding looks wrong.
Do not install diagnostics tools on managed devices unless your IT policy allows it. A screenshot from Windows Settings or Task Manager is usually safer.
Before sharing a report, remove serial numbers, Windows product IDs, computer names, user names, BitLocker identifiers and network details.
Optional: Read-Only PowerShell Commands
These commands read information. They do not change settings.
For a general system summary:
Get-ComputerInfo -Property OsName,OsVersion,OsBuildNumber,CsManufacturer,CsModel,CsSystemType,CsTotalPhysicalMemory,BiosFirmwareType,BiosSMBIOSBIOSVersion | Format-List
For CPU:
Get-CimInstance Win32_Processor | Select-Object Name,NumberOfCores,NumberOfLogicalProcessors,MaxClockSpeed
For system model and RAM amount:
Get-CimInstance Win32_ComputerSystem | Select-Object Manufacturer,Model,SystemType,@{Name="RAM_GB";Expression={[math]::Round($_.TotalPhysicalMemory/1GB,1)}}
For RAM modules:
Get-CimInstance Win32_PhysicalMemory | Select-Object BankLabel,Capacity,Speed,ConfiguredClockSpeed,Manufacturer,PartNumber
For storage devices:
Get-CimInstance Win32_DiskDrive | Select-Object Model,InterfaceType,MediaType,Size
For graphics:
Get-CimInstance Win32_VideoController | Select-Object Name,AdapterRAM,DriverVersion
For TPM:
Get-Tpm
For Secure Boot, use this only if you understand that it requires PowerShell as administrator and UEFI:
Confirm-SecureBootUEFI
Older guides often use wmic. Microsoft treats WMIC as legacy/deprecated, so use PowerShell and CIM commands for new instructions.
If You Are Checking Specs for a Game or App
Game and app requirements usually map to Windows fields like this:
| Requirement line | Where to check | What to compare |
|---|---|---|
| Processor / CPU | Settings > About, Task Manager > CPU, or msinfo32 | Exact CPU model, core count and generation if the app lists one. |
| Memory / RAM | Settings > About or Task Manager > Memory | Installed RAM, not storage capacity. |
| Graphics / GPU | Task Manager > GPU, dxdiag > Display, Device Manager > Display adapters | GPU model and whether it is integrated or dedicated. |
| Video memory / VRAM | Task Manager > GPU or dxdiag > Display | Dedicated GPU memory when the requirement asks for dedicated VRAM. |
| Storage space | Settings > System > Storage | Free space on the drive where you plan to install the app. |
| DirectX | dxdiag > System tab | DirectX version and driver model where relevant. |
If your laptop shows both Intel/AMD integrated graphics and an NVIDIA/AMD/Intel Arc dedicated GPU, the game may use one or the other depending on Windows graphics settings, power mode and driver control panels. Seeing two GPUs is normal on many gaming and creator laptops.
What to Blur Before Sharing Screenshots
If you are sending screenshots to support or posting them online, hide:
- device name, computer name, system name and user name;
- device ID, product ID, serial numbers and service tags;
- Microsoft account name or email;
- hardware IDs, PNP Device IDs and device instance paths;
- driver file paths if they contain a user profile name;
- BitLocker recovery information, TPM certificate/key screens or security ownership details.
A clean screenshot of the CPU model or RAM amount is usually enough. A full dxdiag or msinfo32 export can contain much more data than a support helper needs.
If the helper asks for an export, send it privately where possible, not as a public forum attachment. Open the file first and search for your computer name, user name, product ID and serial-like fields. If you would not want that text indexed by search engines, do not post it publicly.
Why Different Windows Tools Show Different Numbers
Do not panic if two screens do not look identical.
Task Manager is a live performance view. Settings is a simple summary. System Information is a broader inventory. dxdiag focuses on DirectX, graphics and drivers. Device Manager shows devices and drivers Windows recognizes.
Common examples:
- VRAM looks different: dxdiag may show approximate total graphics memory, while Task Manager separates dedicated and shared GPU memory.
- Storage looks smaller than advertised: drive makers use decimal units, Windows displays usable formatted capacity differently, and some space is reserved.
- RAM speed looks unexpected: laptops and desktops can run memory below rated kit speed depending on BIOS settings, CPU support and module mix.
- GPU 0 and GPU 1 appear: many laptops have integrated graphics plus a dedicated GPU.
- Secure Boot says Off or Unsupported: the PC may be in Legacy BIOS mode, Secure Boot may be disabled, or the firmware may need model-specific configuration.
If the goal is only to share basic specs, use Settings first. If the goal is compatibility or troubleshooting, gather the exact screen that matches the question.
Before You Touch Firmware
For normal spec-checking, you should not need to enter BIOS/UEFI at all. Read from Windows first, take the screenshots you need, and only then decide whether a firmware change is actually part of the problem.
Use Microsoft’s own guidance as the tiebreaker for anything that can affect boot or encryption: TPM 2.0, Secure Boot, and BitLocker recovery keys.
The safe order is simple: read first, screenshot second, back up recovery keys, change firmware last.