
The fastest safe way to check whether your PC is ready for Windows 11 is to run Microsoft’s PC Health Check app, then confirm the result with two built-in Windows screens: tpm.msc for TPM 2.0 and msinfo32 for BIOS Mode and Secure Boot State.
The important word is safe. A lot of Windows 11 upgrade problems happen after someone sees “TPM not found” or “Secure Boot unsupported,” opens BIOS, flips several settings, and then discovers the PC no longer boots or BitLocker wants a recovery key.
This guide is built around that real-world failure point. It shows what to check, what each result means, and what to do next without treating every old PC like a simple settings toggle.
Quick Answer
Run PC Health Check, then verify TPM and Secure Boot from Windows
If PC Health Check says the PC is eligible, upgrade through Windows Update when offered. If it fails, read the exact failed requirement before changing firmware settings.
tpm.mscYou want TPM ready for use and Specification Version 2.0.msinfo32Check BIOS Mode and Secure Boot State before touching BIOS/UEFI.If your PC fails only because TPM or Secure Boot is disabled, it may be fixable. If it fails because the CPU is unsupported, Windows 11 may still be blocked even on a fast older PC.
2026 Check: Do Not Confuse These Three Results
Windows 11 readiness now gets mixed with Windows Update timing, used-PC listings and Copilot+ PC marketing. Keep the checks separate:
- Windows 11 eligible: PC Health Check says the hardware meets the normal Windows 11 requirements. That is the basic pass.
- Upgrade offered now: Windows Update may still delay the upgrade if Microsoft has a compatibility safeguard for that device or driver.
- Copilot+ PC features: those are a separate newer-device class in Microsoft’s Windows 11 specifications. They need an NPU capable of 40+ TOPS plus higher memory/storage requirements; a normal Windows 11 PC does not become a Copilot+ PC just because it can install Windows 11.
If you are buying a used PC, ask for the exact CPU model, RAM, storage size, tpm.msc result, msinfo32 BIOS Mode/Secure Boot State, and a current PC Health Check screenshot. A listing that only says “Windows 11 ready” is not enough, especially for older Intel 7th-gen, early Ryzen, refurbished business PCs, or machines upgraded from Windows 10.
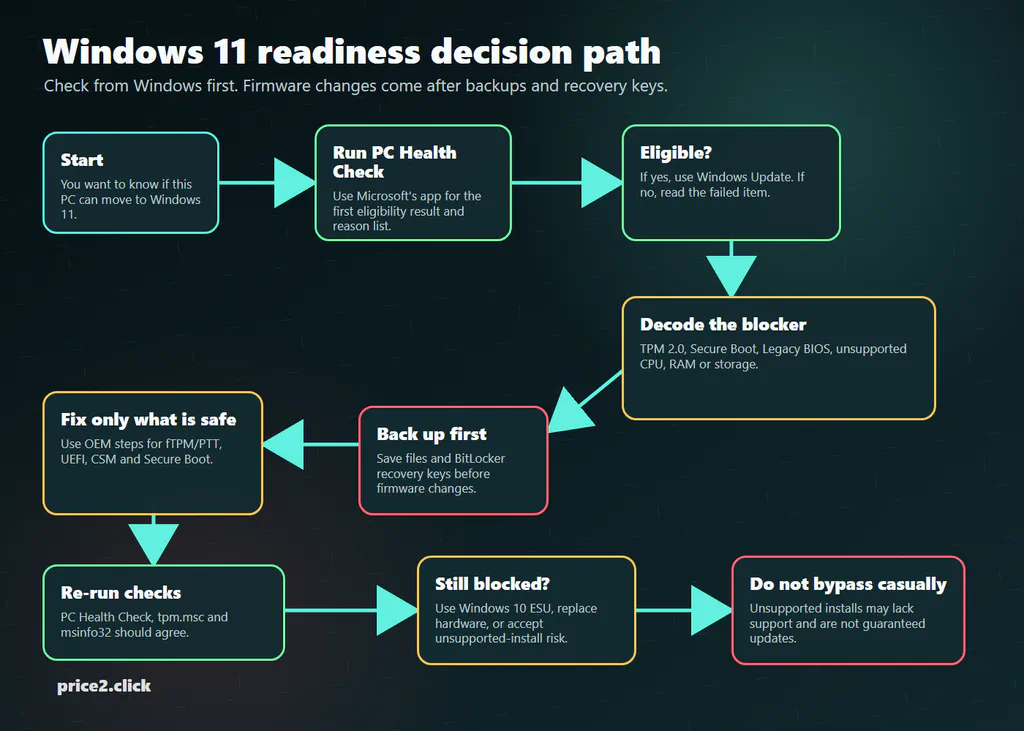
Treat Windows 11 readiness as a decision path, not a single BIOS switch.
If You Only Need the Safe Answer
Do this before opening BIOS/UEFI:
- Run PC Health Check and open the failed-requirement details if it does not pass.
- Run
tpm.mscand check whether TPM is ready and whether Specification Version says2.0. - Run
msinfo32and check BIOS Mode, Secure Boot State, System Manufacturer and System Model. - Open Windows Security > Device security and check whether Windows sees a security processor and Secure Boot information.
- Save your BitLocker recovery key before changing any TPM, Secure Boot, CSM, UEFI or boot-order setting.
If you are asking someone for help, send the PC Health Check result plus screenshots of tpm.msc and msinfo32 with private fields hidden. The useful fields are the failed requirement, TPM status/version, BIOS Mode, Secure Boot State and exact device model. Do not send your BitLocker key, product ID, serial number, computer name, Microsoft account email or full device IDs.
That small set is usually enough to tell whether the next step is a safe setting check, a model-specific BIOS guide, a Windows 10 ESU bridge, or a hardware replacement plan.
If the problem is already happening, start with the closest support case instead of guessing:
- Windows 11 update keeps rolling back if the upgrade downloads, restarts, then undoes changes.
- TPM disappeared after a BIOS update if
tpm.mscchanged after firmware work. - BitLocker asks for a recovery key after BIOS or Secure Boot changes if Windows is already asking for recovery.
- Secure Boot is enabled in firmware but Windows says off if
msinfo32and BIOS/UEFI disagree.
Windows 11 Requirements That Actually Matter
Windows 11 has normal-looking requirements, but some of them hide security and firmware details that older guides gloss over.
| Requirement | What Windows 11 expects | Where to check |
|---|---|---|
| Processor | A compatible 64-bit CPU or SoC, not merely any 1 GHz dual-core chip. | PC Health Check, Settings > System > About, or Microsoft's CPU lists. |
| RAM | At least 4 GB. | Settings > System > About or Task Manager > Performance > Memory. |
| Storage | At least 64 GB storage device. | Settings > System > Storage. |
| Firmware | UEFI and Secure Boot capable. | msinfo32 for BIOS Mode and Secure Boot State. |
| TPM | TPM 2.0. | tpm.msc or Windows Security > Device security. |
| Graphics | DirectX 12 compatible graphics with WDDM 2.0 driver. | Task Manager, Device Manager or dxdiag. |
| Display | 720p display larger than 9 inches, 8 bits per color channel. | Usually obvious on laptops/desktops; PC Health Check may not validate every display/graphics detail. |
The CPU line is the one that surprises people. A powerful 2017 gaming PC can fail while a newer budget laptop passes. Microsoft is not judging only raw speed; it is filtering for supported processor generations and the security features Windows 11 expects.
If you only need to find your CPU, RAM, GPU or Windows build first, use our Windows PC specs guide, then come back to this readiness checklist.
Step 1: Run Microsoft’s PC Health Check
Use Microsoft’s PC Health Check support page or the Windows 11 specifications page to get the official download link.
After installing it:
- Open PC Health Check.
- Find the Windows 11 section.
- Click Check now.
- Open the details if it says the PC does not meet requirements.
- Write down the exact failed item before changing anything.
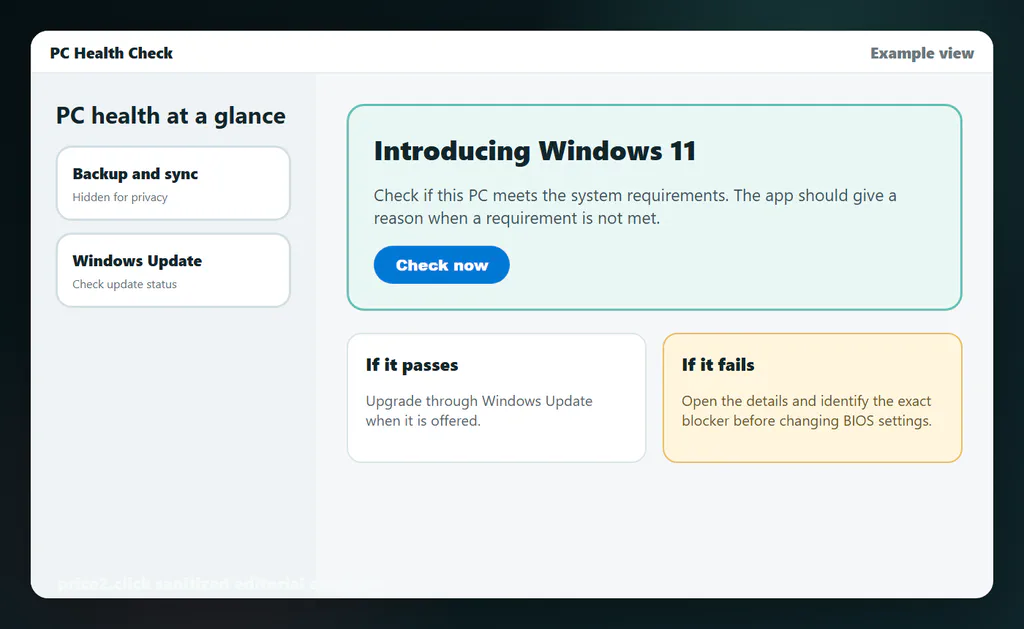
PC Health Check is the best first pass, but the details matter more than the headline result.
PC Health Check is useful because it tells most normal users where to start. It is not the only check you need. Microsoft’s own Windows 11 specifications page notes that PC Health Check does not check every graphics card or display requirement, and Windows Update may still delay an upgrade because of compatibility safeguards.
If PC Health Check fails, resist the urge to search the exact error and follow the first BIOS video. The failed line is only the clue. The safe diagnosis is: which requirement failed, what does Windows currently see, and what exact PC model are we dealing with?
Step 2: Check TPM 2.0
Press Windows key + R, type tpm.msc, and press Enter.
Look for:
- Status: The TPM is ready for use.
- Specification Version: 2.0.
If Windows says a compatible TPM cannot be found, it does not automatically mean the PC has no TPM at all. On many PCs, TPM is implemented inside the CPU or chipset firmware and may simply be disabled in UEFI.
Common TPM names in BIOS/UEFI:
| What you are looking for | Possible firmware names | Plain-English note |
|---|---|---|
| Intel firmware TPM | Intel PTT, Platform Trust Technology, PCH-FW Configuration. | Common on Intel systems from the Windows 10 era onward. |
| AMD firmware TPM | AMD fTPM, AMD CPU fTPM, AMD PSP fTPM. | Common on Ryzen systems, but older BIOS versions may need updates. |
| Generic security device | Security Device Support, Trusted Computing, TPM State, Security Chip. | Often used by MSI, Lenovo, Dell, HP and business devices. |
| Discrete module | dTPM, TPM Device Selection, TPM module. | Do not buy a module before checking motherboard support and CPU firmware TPM options. |
For most home users, do not start by buying a TPM module. First check the exact motherboard or laptop model and the OEM’s instructions. Many technically compatible machines only need a firmware setting or BIOS update.
If tpm.msc says TPM is missing, take a screenshot of that window and then find the PC or motherboard model in msinfo32. A helper cannot give safe TPM steps from “Ryzen PC” or “Dell laptop” alone; menu names and BIOS dependencies vary by vendor and generation.
Step 3: Check Secure Boot and BIOS Mode
Press Windows key + R, type msinfo32, and press Enter.
In System Summary, check:
| Field | Useful result | What it means |
|---|---|---|
| BIOS Mode | UEFI | The PC is booting in modern UEFI mode. Secure Boot depends on UEFI. |
| Secure Boot State | On, Off or Unsupported | On is simplest. Off may be fixable. Unsupported often means Legacy/CSM boot or firmware limitation. |
| System Model | Exact laptop, desktop or motherboard model | You need this before trusting BIOS instructions from a forum or video. |
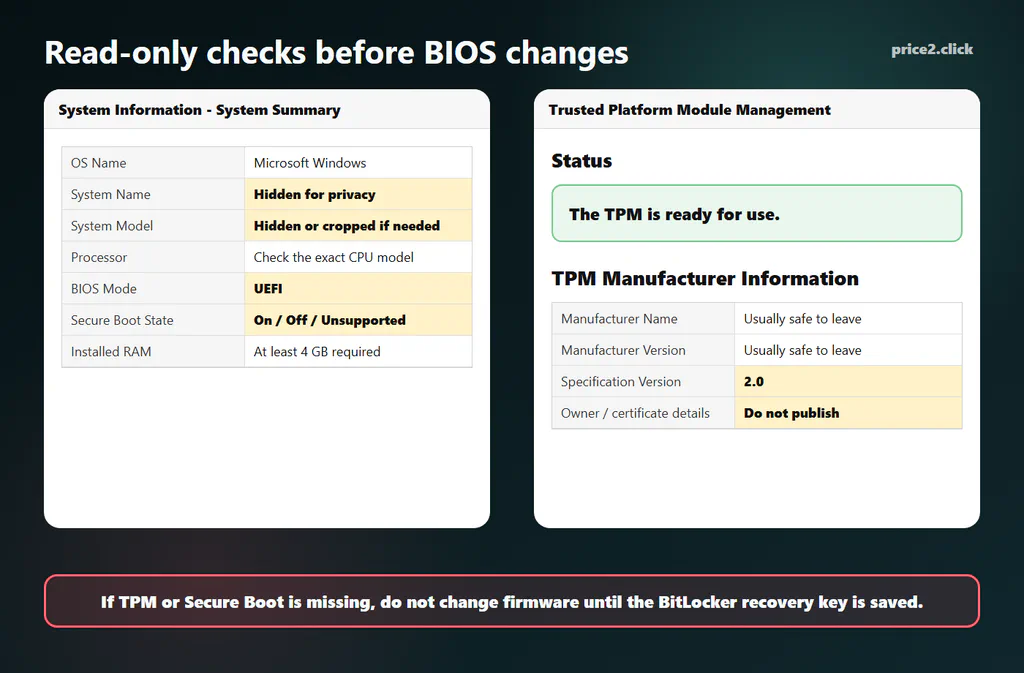
Use tpm.msc and msinfo32 as read-only checks before changing UEFI or Secure Boot settings.
Important nuance: Microsoft describes the Windows 11 requirement as UEFI, Secure Boot capable. That does not mean you should ignore Secure Boot being off, and it also does not mean every PC can be fixed by turning one switch on. A PC can be UEFI-capable, Secure Boot-capable, currently booting in Legacy mode, or blocked by missing keys and firmware behavior.
If msinfo32 says BIOS Mode: Legacy, stop before changing Secure Boot. On many machines, switching from Legacy/CSM to pure UEFI is not a harmless toggle; the disk layout and boot path may need to be handled first.
For the separate 2026 Secure Boot certificate transition, see our Windows Secure Boot certificates guide.
What Each Failed Result Usually Means
Use this before you touch BIOS/UEFI.
| Message or result | Likely meaning | Safer next step |
|---|---|---|
| TPM not found | TPM may be disabled, hidden under Intel PTT/AMD fTPM, or absent on very old hardware. | Check OEM BIOS docs for the exact model. Do not buy a TPM module first. |
| TPM Specification Version is 1.2 | Windows sees TPM, but not TPM 2.0. | Check whether firmware can switch to TPM 2.0 or whether the device is too old. |
| Secure Boot State: Off | Secure Boot exists but is disabled or not fully configured. | Back up recovery keys, check BIOS Mode and OEM steps, then enable only if the boot setup supports it. |
| Secure Boot State: Unsupported | The PC may be booting in Legacy/CSM mode, or the firmware lacks usable Secure Boot support. | Check BIOS Mode. If it says Legacy, do not simply flip to UEFI without checking disk layout. |
| BIOS Mode: Legacy | The current Windows install is not booting as UEFI. | Assume MBR/GPT and boot-loader risk. Back up first; use model-specific guidance. |
| Unsupported CPU | The processor is outside Microsoft's supported Windows 11 CPU list, even if it is fast. | Confirm the exact CPU model. Plan ESU, hardware replacement, or accept unsupported-install risk. |
| Not enough RAM or storage | The PC misses a basic capacity requirement. | RAM/storage upgrades may fix this if the machine is otherwise supported. |
Before You Change BIOS: Save the BitLocker Key
This is the step many short guides skip.
BitLocker and Windows device encryption can react to firmware, TPM and Secure Boot changes. If Windows thinks the boot path changed in a way that affects trust, it may ask for the BitLocker recovery key at startup. If you do not have that key, the drive can be effectively locked away from you.
Before changing TPM, PTT, fTPM, CSM, UEFI, Secure Boot, boot order or firmware keys:
- Back up important files.
- Save or print the BitLocker recovery key.
- Confirm you can sign in to the Microsoft account, work account or school account that stores it.
- Check the exact device name and Key ID if more than one key is listed.
- If this is a work or school PC, stop and ask IT.
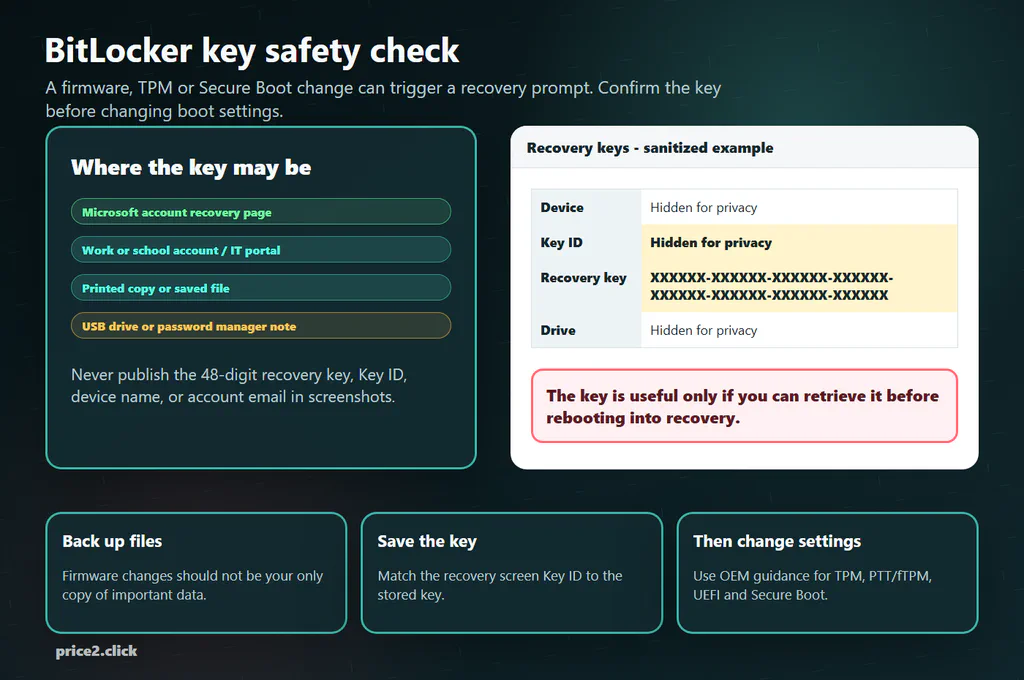
A BitLocker recovery key is only helpful if you can retrieve it before the firmware change causes a recovery prompt.

Do not publish screenshots of a real recovery-key page unless the recovery key, Key ID, device names, drive labels, account names and dates are hidden. A blurred device name is not enough if the key is still readable.
If TPM or Secure Boot Is Disabled
If the hardware is otherwise compatible, the fix may be simple. The dangerous part is assuming it is always simple.
Safer order:
- Save files and BitLocker recovery keys.
- Check the exact laptop, desktop or motherboard model.
- Update BIOS/UEFI only from the PC or motherboard maker if needed.
- Look for Intel PTT, AMD fTPM, TPM State or Security Device Support.
- Check whether the system is already booting in UEFI mode.
- If Secure Boot is available, follow the OEM’s order for disabling CSM, loading default Secure Boot keys and enabling Secure Boot.
- Boot Windows and rerun PC Health Check,
tpm.mscandmsinfo32.
If Windows is installed in Legacy mode on an MBR disk, switching the firmware to pure UEFI can make the current install unbootable until the disk and boot path are handled correctly.
On some motherboards, Secure Boot will not really turn on until CSM is disabled and default platform keys are installed. Do not reset keys unless you know the model-specific path.
ASUS, MSI, Gigabyte, ASRock, Dell, HP and Lenovo can use different menu names and dependencies for the same underlying feature.
If the CPU Is Unsupported
This is the frustrating one. PC Health Check can reject a machine that feels fast because Windows 11 CPU support is not based only on clock speed, core count or whether the PC can open apps smoothly.
Examples of older but still capable-feeling hardware that often disappoints users include Intel 7th-gen Core desktops and laptops, some first-generation Ryzen systems, and very old PCs that can be pushed into running Windows 10 but miss newer Windows 11 security or instruction expectations.
What to do:
- Confirm the exact CPU model in Settings, Task Manager or
msinfo32. - Check Microsoft’s supported processor list or PC Health Check result.
- Do not spend money on RAM, an SSD or a TPM module if the CPU is the blocker.
- If the rest of the PC is old, plan platform replacement instead of chasing one more workaround.
- If you choose an unsupported Windows 11 install, understand that Microsoft does not recommend it and updates are not guaranteed.
This is where a buying helper should be honest: a cheap SSD can make an old Windows 10 PC feel better, but it does not make an unsupported CPU officially eligible for Windows 11.
Windows 10 in 2026: What If You Cannot Upgrade?
Normal consumer Windows 10 support ended on October 14, 2025. That does not mean every Windows 10 PC instantly stopped working, but it does mean the default free support window is over.
For many U.S. home users, Microsoft’s consumer Extended Security Updates path is the bridge option through October 13, 2026. Microsoft lists consumer enrollment routes such as syncing PC settings through Windows Backup, using Microsoft Rewards points, or paying a one-time fee where available. Details can differ by region, account type and device management state.
Use this decision table:
| Your situation | Practical choice | Why |
|---|---|---|
| PC passes Windows 11 checks | Upgrade through Windows Update when ready. | This is the cleanest supported route. |
| Only TPM/Secure Boot is off | Fix firmware settings carefully, then rerun checks. | The hardware may already be compatible. |
| CPU is unsupported | Use ESU temporarily or plan replacement. | A setting change usually will not fix CPU eligibility. |
| Old work/school PC | Ask IT before changing anything. | Managed devices may use policies, encryption and staged upgrades. |
| Special legacy machine | Isolate, back up and plan a supported replacement path. | Registry bypasses are not a maintenance plan. |
Should You Bypass Windows 11 Requirements?
For a normal reader, the answer should be: not as the first plan.
Bypass guides can be useful for labs, testing, temporary rescue work or people who fully understand the support tradeoff. They are a poor default recommendation for a family PC, work machine, school laptop or device that stores important data.
The risks:
- Microsoft does not recommend installing Windows 11 on devices that do not meet minimum requirements.
- Unsupported devices may not receive support and are not guaranteed updates.
- Very old CPUs can hit newer instruction-set blockers.
- Firmware and boot changes can create BitLocker or boot-loader problems.
- A “works today” bypass may become a maintenance problem after a feature update.
If the PC is important enough that losing access would hurt, treat unsupported Windows 11 as a last resort, not a clever shortcut.
What to Send to Support Before You Change Anything
If you want a second opinion, send a clean diagnostic set instead of a long story:
- PC Health Check result with the failed requirement expanded.
tpm.mscstatus and Specification Version.msinfo32System Summary showing BIOS Mode, Secure Boot State, System Manufacturer and System Model.- Settings > System > About showing processor, RAM, Windows edition and version.
- Whether BitLocker/device encryption is on and whether you already have the recovery key. Do not send the key itself.
- Your goal: “I want to upgrade this PC to Windows 11,” “I need to keep Windows 10 safely for another year,” or “I only need to know whether a used PC is worth buying.”
Blur product IDs, serial numbers, computer names, user names, Microsoft account emails, BitLocker key IDs and any full recovery key. The helper needs the readiness facts, not your identifiers.
Quick Glossary
| Term | Plain-English meaning | Why it matters |
|---|---|---|
| TPM | A security processor or firmware security feature used to protect keys and device trust. | Windows 11 requires TPM 2.0. |
| fTPM / PTT | Firmware TPM names for AMD and Intel systems. | The feature may exist even when Windows says TPM is not found. |
| UEFI | Modern PC firmware mode that replaced legacy BIOS. | Secure Boot depends on UEFI. |
| CSM / Legacy Boot | Compatibility mode for older boot methods. | Can block Secure Boot and complicate Windows 11 readiness. |
| Secure Boot | A UEFI feature that checks trusted boot software before Windows starts. | Windows 11 expects Secure Boot capability and it improves early-boot security. |
| MBR / GPT | Disk partition styles used by older BIOS boot and modern UEFI boot paths. | Legacy-to-UEFI changes can fail if the disk layout and boot files are not ready. |
| BitLocker recovery key | A long recovery code used to unlock an encrypted Windows drive after a trust change. | You may need it after TPM, Secure Boot or firmware changes. |
FAQ
Can my PC run Windows 11 without TPM 2.0?
Not through the normal supported route. Windows 11 requires TPM 2.0. Bypass methods exist, but they are not the recommendation for a normal daily-use PC.
Does Secure Boot need to be enabled or just supported?
Microsoft’s requirement language is Secure Boot capable, but enabling Secure Boot is recommended for security and often part of getting a clean readiness state. Check msinfo32 first. Do not flip Secure Boot on blindly if the PC is in Legacy/CSM mode.
What does Secure Boot State Unsupported mean?
It often means Windows is booting in Legacy mode, Secure Boot is unavailable in the current firmware configuration, or the device firmware does not expose Secure Boot properly. Check BIOS Mode in msinfo32 and the exact device model before changing settings.
How do I know if I have Intel PTT or AMD fTPM?
Check your CPU brand and BIOS/UEFI menus. Intel systems often call it PTT or Platform Trust Technology. AMD systems often call it fTPM or AMD CPU fTPM. Laptop vendors may call it TPM State, Security Chip or Security Device Support.
Should I buy a TPM module?
Usually not first. Many PCs already have firmware TPM support. A physical TPM module must match the motherboard’s header, pinout and firmware support, and it still will not fix an unsupported CPU.
Can I keep using Windows 10?
Yes, the PC will still turn on, but normal consumer support ended October 14, 2025. Check Microsoft’s Windows 10 Extended Security Updates options if you need more time, and plan a supported replacement or upgrade path.
Is Windows 11 on unsupported hardware always broken?
No. Some unsupported installs work for a while. The problem is support and predictability. Microsoft does not recommend it, and updates are not guaranteed on devices that do not meet minimum requirements.
Final Safe Order
If a readiness result sends you toward TPM, Secure Boot or a firmware menu, keep Microsoft’s own pages open for PC Health Check, TPM 2.0, Windows 11 and Secure Boot, and BitLocker recovery keys. Use them as guardrails, not as a reason to click every firmware option at once.
The safe order is:
- Read the current Windows status.
- Screenshot only the fields that matter.
- Save recovery keys.
- Check the exact PC or motherboard model.
- Follow model-specific firmware steps only if the failed requirement is actually fixable.
- Rerun PC Health Check,
tpm.mscandmsinfo32.
If Secure Boot looks enabled in firmware but Windows still says otherwise, compare your screens with our Secure Boot support example before changing more boot settings.